Getting Started with COLY
Add custom form fields to your product pages and collect additional information from customers at checkout—like gift messages, engraving text, or special instructions.
Overview
COLY lets you create custom forms that appear on your product pages. When customers fill out these forms, the data is saved with their order so you can fulfill their requests.
Common use cases include:
- Gift messages — Let customers add personalized notes
- Engraving or customization text — Collect text for personalized products
- Special instructions — Gather delivery preferences or handling notes
- Product options — Add custom options beyond Shopify variants
Create Your First Form
Now let's create a simple form with a "Gift Message" text field:
- Open the COLY app from your Shopify admin
- Click Create form
- Give your form a name (e.g., "Gift Message Form")
- Click Add field and select Textarea
- Configure the field:
- Label: "Gift Message"
- Placeholder: "Enter your personalized message..."
- Required: Toggle on if the field is mandatory
- Under Display conditions, choose which products should show this form:
- All products — Shows on every product page
- Product — Select individual products
- Tagged with — Show based on product tags
- Product vendor — Show based on product vendor
- Product type — Show based on product type
- Click Save

Add Form to Product Page
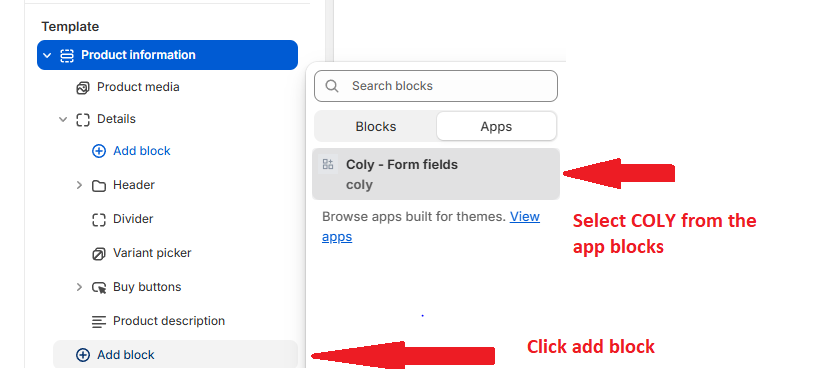
Your form is created, but you need to add the COLY block to your product page template:
- Go to Online Store → Themes → Customize
- Navigate to a Product page template
- In the product section, click Add block
- Select the COLY app block
- Position the block where you want the form to appear (typically above the Add to Cart button)
- Click Save
The form will only appear on products that match your display conditions.
Test on Storefront
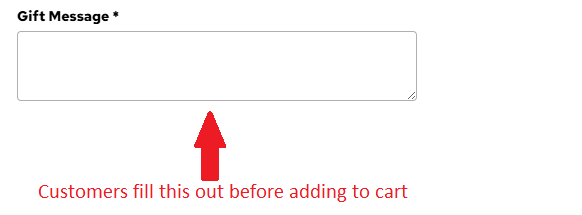
Visit your storefront to verify everything works:
- Navigate to a product page that matches your form's display conditions
- You should see the Gift Message field
- Enter some text and add the product to cart
- Proceed to checkout—the custom field data travels with the order
- After placing a test order, check Shopify Admin → Orders to see the captured data
You've successfully added custom fields to your product pages. Next, learn how to create dynamic forms with conditional logic.