Conditional Logic
Show or hide form fields based on customer selections—keeping forms simple while collecting all the information you need.
What is Conditional Logic?
Conditional logic lets you create dynamic forms that respond to customer input. Instead of showing every field at once, you can:
- Show fields only when relevant (e.g., show "Allergy Info" only for food customizations)
- Hide fields when they don't apply (e.g., hide "Gift Wrap Color" if customer selects "No Gift Wrap")
- Create guided experiences where each selection reveals the next relevant question
This is COLY's superpower for creating clean, user-friendly forms that don't overwhelm customers.
Bakery Case Study
Let's walk through a real-world example: a bakery that sells both standard and custom cakes.
The scenario: You only need allergy information when a customer orders a custom cake. For standard cakes, the ingredients are fixed and listed on the product page.
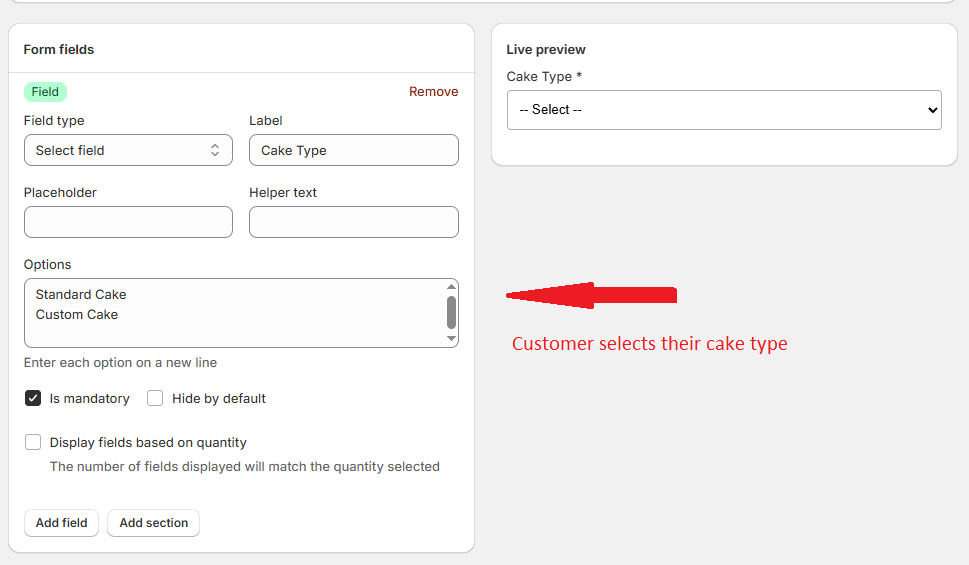
Step 1: Create the Cake Type Field
- Open COLY and create a new form (or edit an existing one)
- Add a Select field:
- Label: "Cake Type"
- Options: "Standard Cake", "Custom Cake"
- Required: Yes
Step 2: Add the Allergy Info Field
- Click Add field and select Textarea
- Configure the field:
- Label: "Allergy Information"
- Placeholder: "Please list any allergies or dietary restrictions..."
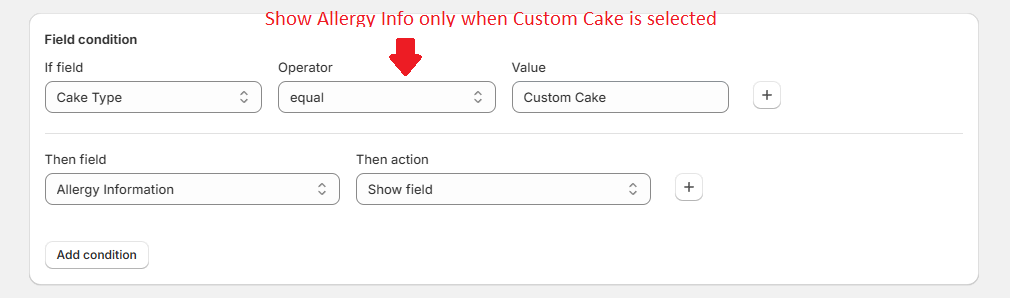
Step 3: Set Up the Condition
- With the Allergy Information field selected, find the Field conditions section
- Click Add condition
- Configure:
- Field: Cake Type
- Operator: equal
- Value: Custom Cake
- Action: Show field
- Save your form
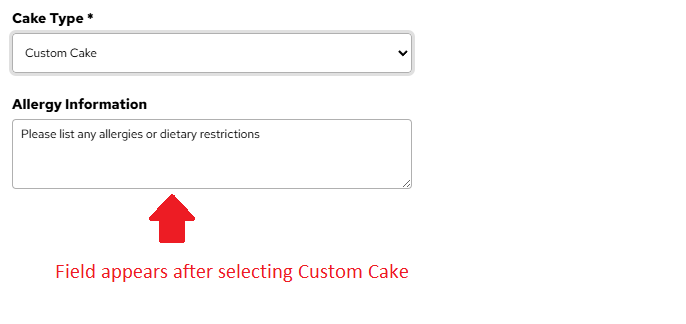
The Result
Now on your storefront:
- Customer sees only the "Cake Type" dropdown initially
- When they select "Standard Cake" → No additional fields appear
- When they select "Custom Cake" → The "Allergy Information" field appears
How Conditions Work
Operators
COLY supports these comparison operators:
| Operator | Use Case |
|---|---|
| equal | Show field when selection matches exactly |
| not equal | Show field when selection is anything except the value |
| more than | Show field when number input exceeds a threshold |
| more or equal than | Show field when number input meets or exceeds a threshold |
| less than | Show field when number input is below a threshold |
| less or equal than | Show field when number input meets or is below a threshold |
Actions
Each condition can trigger one of two actions:
- Show field — The field is hidden by default and appears when the condition is met
- Hide field — The field is visible by default and hides when the condition is met
Multiple Conditions
You can add multiple conditions to a single field:
- All conditions must be met (AND logic) — Use when you need multiple criteria satisfied
- Any condition can be met (OR logic) — Use when you have alternative triggers
Best Practices
Keep Forms Simple
Start with the minimum fields needed. Add conditional fields for edge cases rather than showing everything upfront. Customers appreciate clean, focused forms.
Test All Condition Paths
Before going live, test every possible selection combination:
- Select each option in dropdown fields
- Verify the correct fields appear/disappear
- Submit test orders through each path
- Check that all data is captured correctly in orders
Use Clear Labels
When fields appear conditionally, make sure they have clear, contextual labels. Customers should immediately understand why the field appeared and what information you need.
Avoid Deep Nesting
While you can have conditions that depend on conditions, try to keep your form logic shallow. More than 2-3 levels of conditional fields can become confusing to maintain.
Conditional fields that are hidden when the form is submitted won't include any data in the order—so you don't need to worry about stale data from fields the customer didn't see.